In a world where markets move faster than ever, traders need tools that adapt with precision and intelligence. That’s where WJ ZonePilot EA comes in — a powerful MT5 Expert Advisor designed to simplify decision-making and automate key trading actions around user-defined price zones.
Whether you're a discretionary trader who marks supply and demand levels manually, or a semi-automated trader seeking efficiency, WJ ZonePilot EA bridges the gap between strategy and execution.
🔍 What Is ZonePilot EA?
ZonePilot EA is an intelligent zone-based trading system for MetaTrader 5. It allows you to mark zones on the chart (using two price levels), and it takes care of the rest: monitoring price behavior, placing pending orders, managing risk, and securing profits — all with minimal input.
Unlike traditional EAs that rely solely on indicators or rigid systems, ZonePilot EA puts control in the trader’s hands. You define the zones; it reacts accordingly, using smart rules.
⚙️ Key Features
✅ Manual Zone Detection
Draw your own support/resistance or supply/demand zones with precision. The EA recognizes them automatically.
✅ Pullback Logic with Confirmation
WJ ZonePilot only activates orders when price leaves a zone and closes outside it (you choose the timeframe). No random entries.
✅ Auto Pending Orders
Depending on price location, the EA places buy/sell limit orders with perfect placement, SL, and TP.
✅ Dynamic Lot Sizing
Risk is calculated based on your account size and SL distance. No overleveraging. Works on all brokers and symbols.
✅ Break-even & Progressive Trailing
When price reaches 1R, the EA moves SL to breakeven. At 2R, it moves to 1R. At 3R, it goes to 2R — a safe, logical profit lock system.
✅ Session-Based Trading Filter
Limit trading to specific hours (e.g., 09:00–17:00 GMT+1) to avoid off-hours volatility.
✅ Daily Risk/Profit Limits
Automatically stops trading for the day if a maximum % of gain or loss is reached.
✅ Clean Interface with Zone Panel
A custom panel on your chart makes adding, editing, or removing zones simple and intuitive — no extra indicators needed.
📈 Why Traders Love It
Many EAs operate blindly — trading every signal without context. ZonePilot is different. It respects your zones, waits for proper confirmation, and trades only when it makes sense.
It’s especially useful for:
- Traders who use price action or supply/demand zones
- Swing traders wanting automation during zone re-tests
- Funded traders needing precise risk control
- Anyone who wants automation without losing manual input
📦 Compatibility
- ✅ MT5 only
- ✅ Forex, Gold, Indices, Synthetic assets
- ✅ ECN/STP brokers
- ✅ Compatible with funded platforms (FTMO, MyForexFunds, etc.)
💬 Thoughts
WJ ZonePilot EA is not just another black-box bot. It's a flexible, intelligent trading companion that respects your strategy, executes with precision, and keeps your risk under control. For zone-based traders, it could be the missing link between chart analysis and execution because it keeps your emotion out of the equation.
🖥️ How to Use It
After downloading the EA from the MQL5 Market: https://www.mql5.com/en/market/product/142078
1. Attach the EA to a chart
- Use any timeframe (e.g., M15 or H1).
- One chart per symbol is recommended.
2. Create a Trading Zone
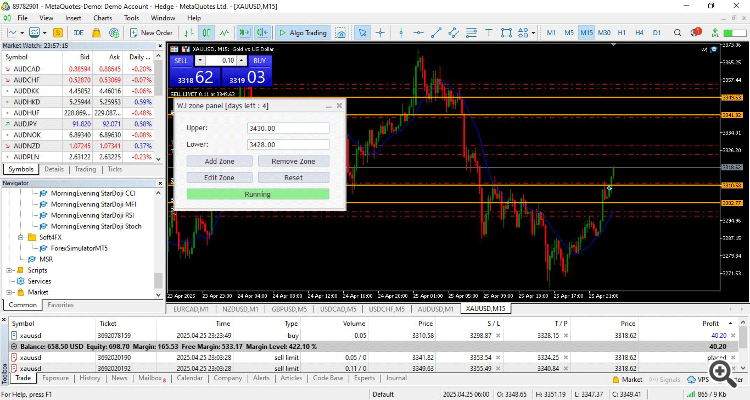
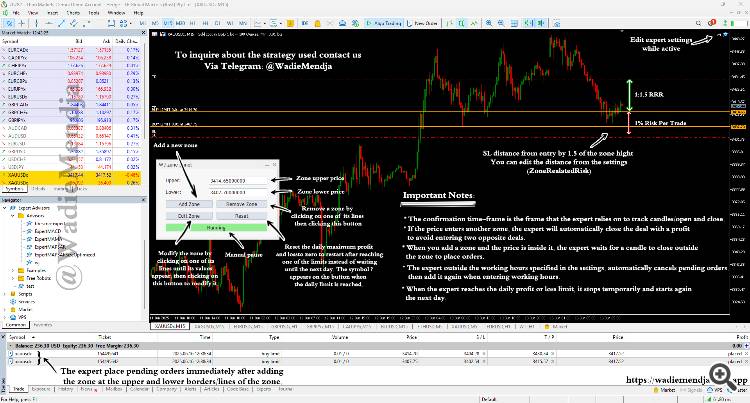
- Use the built-in panel to enter Zone Upper and Zone Lower prices.
- The EA will draw horizontal lines and watch price behavior around this zone.
3. Wait for Pullback
- If the price is inside the zone, the EA waits.
- Once the price closes outside the zone, it prepares pending orders.
4. Trade Execution
- If the price is above the zone → buy limit
- If the price is below the zone → sell limit
- Entry, SL, and TP are calculated automatically using risk settings.
5. Position Management
- Once 1:1 RRR is hit → SL moves to breakeven
- At 1:2, 1:3, etc. → SL moves up progressively (secure profits)
6. Zone Management
- You can manually edit or remove zones.
- The EA will also clean up pending orders if you remove a zone.
⚙️ Inputs (Highlights)
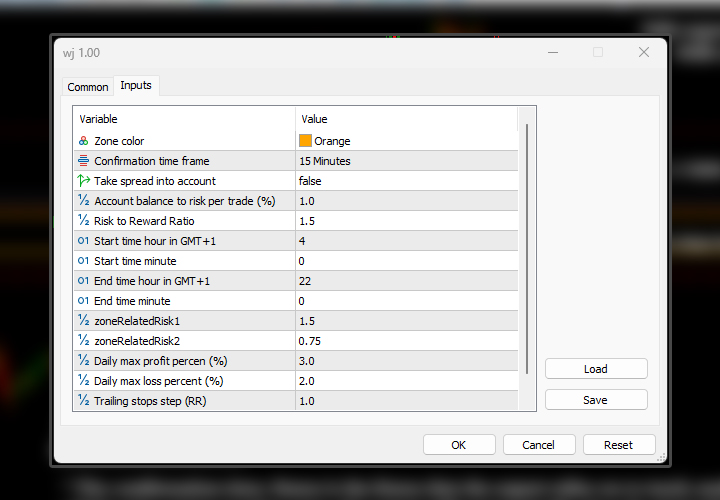
- RiskPercent : % of balance to risk per trade
- Trailing Stop Step (RR) : RRR step for trailing SL (e.g., 1.5 = trail every 1.5R)
- StartHourGMT1 / EndHourGMT1 : Limit trading hours (broker time)
- DailyMaxProfitPercent / DailyMaxLossPercent : Auto-stop for risk control
- Confirmation time frame: the time frame that you want the EA to watch for .. (candles open and close)
- Risk to Reward Ratio: RRR (e.g, 1.5, 2)
- ZoneRelatedRisk1/2: SL distance from the zone pending order (e.g, 1.5 means the SL should be away from the entry by 1.5xZoneHight)
🛑 Important Notes
- ✅ Zones should be placed at prices where you suspect the market will react for better results
- ✅ Works best with brokers that allow fast execution
- ✅ Compatible with most Forex pairs, Gold (XAUUSD), and Indices
- ✅ Supports demo and real accounts
How to Draw Strong Support and Resistance (Supply and Demand) Zones Like a Pro
If you've ever wondered why some price levels attract reversals while others get ignored, you're not alone. Mastering support and resistance — or more precisely, supply and demand zones — is a key skill for traders who want to catch high-probability entries with low risk.
In this article, you’ll learn how to draw strong and reliable zones that actually matter — not random lines on a chart.
🧠 What Are Support & Resistance Zones?
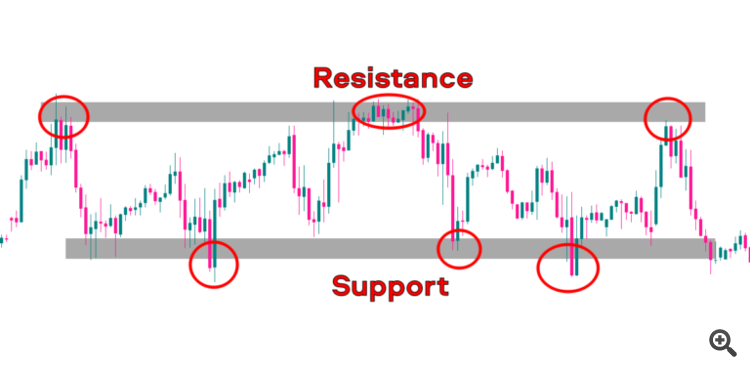
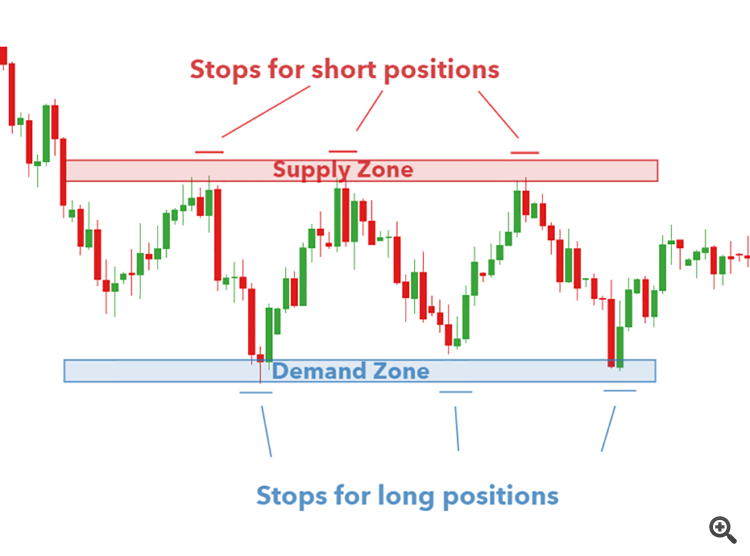
- Support is a price area where demand overcomes supply — price tends to bounce upward.
- Resistance is where supply overcomes demand — price often reverses downward.
But in professional trading, we don’t look at them as exact lines. We treat them as zones or regions of interest — and that's what separates amateurs from experienced traders.
✅ Step-by-Step: How to Draw Powerful Zones
🔍 Step 1: Switch to a Higher Timeframe
Start with H1, H4, or Daily timeframes. Why?
- Higher timeframes filter out noise
- Strong levels on higher frames attract bigger players (institutions, banks)
You can fine-tune entries on M15 or M5 later, but draw zones from H1+.
🔍 Step 2: Identify Strong Reversal Points
Look for areas where price made a sharp move away after hesitation — this often signals institutional activity.
Examples:
- Sharp drop after sideways movement → supply zone
- Strong rally after base formation → demand zone
🧠 Tip: The more obvious the move, the more likely other traders are watching it too — and that creates confluence.
🔍 Step 3: Use the Candle Body, Not Just Wicks
Many traders make the mistake of drawing zones from the extreme wick to wick. But often, it's more reliable to:
- Use the body of the candle for precision
- Extend the zone slightly above/below the wick for tolerance
A good zone might span 10–30 pips depending on the pair and timeframe.
🔍 Step 4: Look for Multiple Touches or Confirmations
The best zones are:
- Fresh (price hasn’t returned to them yet)
- Or have been respected multiple times without being broken
🧠 If price reacted 2 or 3 times from the same zone — it’s likely meaningful.
🔍 Step 5: Mark the Zone with a Rectangle
In MT5:
- Use the Rectangle Tool
- Draw from the base of the zone to the extreme wick
- Extend it right to keep it visible
Name it clearly (e.g., “D1 Supply 1.1050–1.1100”) so you can track it.
🛠️ Extra Tips for Drawing Better Zones
- Avoid clutter — only draw zones with clear structure or sharp reactions
- Combine with trend direction — zones aligned with the trend are stronger
- Use SMA/EMA filters — e.g., don’t draw demand zones below the 100 SMA in a strong downtrend
- Mark zones with time-based labels if you trade sessions (e.g., only trade zones formed during London/NY)
❌ What to Avoid
- Don’t draw zones on every minor pullback
- Don’t force a zone if the reaction wasn’t strong
- Don’t treat zones as guaranteed reversal points — use them as a framework for decision-making
🧠 How WJ ZonePilot EA Helps You Trade Without Emotions — The Psychology Behind It
One of the biggest reasons traders struggle to succeed isn't their strategy — it's their emotions. Fear, greed, hesitation, revenge-trading… these psychological patterns ruin even the most promising trades.
That’s where WJ ZonePilot EA makes a huge difference.
It’s more than an Expert Advisor — it’s a disciplined, emotion-free trading assistant that helps you execute your plan exactly as you intended, every time. In this article, we’ll explore how ZonePilot EA removes emotion from trading, and why that’s critical for long-term success.
🤯 Why Emotions Ruin Trades
Even traders with great technical knowledge fall victim to emotion. Here’s how:
| Emotion | What It Causes |
|---|---|
| ❌ Fear | Closing trades too early, skipping valid setups |
| ❌ Greed | Overtrading, risking too much |
| ❌ Revenge | Trading emotionally after a loss |
| ❌ Hesitation | Missing high-probability entries |
| ❌ Doubt | Ignoring your own plan or second-guessing |
These behaviors lead to inconsistency, broken rules, and drawdowns that could’ve been avoided.
✅ How ZonePilot EA Keeps You Disciplined
ZonePilot EA is designed to act on pre-defined logic, not emotion. Here’s how it helps:
1️⃣ You Define the Zone — It Does the Rest
You mark the supply/demand or support/resistance zones.
Then ZonePilot:
- Waits for the price to exit the zone
- Confirms candle closes outside
- Places pending orders automatically
- Calculates lot size based on your defined risk
❌ No second-guessing.
❌ No impulsive entries.
✅ Just mechanical execution.
2️⃣ Strict Risk Management Removes Fear
ZonePilot never exceeds your risk settings. It:
- Calculates lot size based on your balance
- Uses fixed RRR (Risk:Reward) logic
- Moves SL to breakeven and beyond automatically
You’ll never over-risk, revenge trade, or hold losses longer than planned. It protects your capital — even when you feel tempted to break the rules.
3️⃣ You Don’t Chase Price — Price Comes to You
Instead of chasing breakouts or reacting emotionally to every candle, ZonePilot:
- Waits for price to pull back to the zone
- Places pending orders only if conditions are met
- Waits for confirmation (candle close outside)
This eliminates the need to hover over charts or jump into trades out of FOMO.
4️⃣ Time-Based Limits Reduce Overtrading
You can restrict trading hours (e.g., 09:00–17:00 GMT+1).
Once that window closes, ZonePilot stops — even if you want to “just take one more trade.”
It also:
- Pauses trading if daily profit or loss limits are hit
- Resumes only the next day (emotion cooled)
This is built-in discipline most traders lack.
5️⃣ No Hesitation, No Regret
ZonePilot acts instantly based on your rules. It doesn’t:
- Miss entries
- Panic on drawdowns
- Exit trades too early
It simply executes your plan with perfect consistency. That’s how pros win — not with holy grails, but with discipline.
💬 Real-World Example
Imagine this:
You’ve marked a demand zone on EURUSD.
You’re at work or sleeping.
Price dips into the zone, exits, confirms the candle close.
ZonePilot places a buy limit.
Price fills the order.
RRR 1:1 is reached → SL moves to breakeven
RRR 2:1 → SL trails higher
Eventually, TP is hit — all without you lifting a finger or overthinking.
No fear. No hesitation. No screen watching.
Just pure, unemotional trading.
🎯 Final Thoughts
The difference between average and elite traders isn’t indicators — it’s psychology.
ZonePilot EA gives you the psychological edge by:
- Enforcing your strategy
- Managing your risk
- Automating discipline
- Preventing emotional decisions
If you’re tired of losing because of fear, overtrading, or hesitation — let ZonePilot do what your emotions never could:
Trade with precision. Exit with confidence. Repeat with consistency.
📈 Conclusion
Support and resistance (supply and demand) zones are powerful tools — if drawn with intention. Focus on areas with clear structure, strong rejection, and alignment with the bigger picture.
Practice on historical charts and wait for price to return to your zones before acting. Combine them with confirmation tools or smart EAs like WJ ZonePilot EA, and you’ll be trading with precision instead of guesswork.
🔗 Ready to try it?
Download trial, define your zones, and let WJ ZonePilot handle the rest: https://www.mql5.com/en/market/product/142078


0 Comments